
Halts and overnight stays
A tourist bivouac is a rest for the participants of the hike, a place where they eat, sleep and prepare for the further journey, it is a fire, a hearth, shelter from bad weather. Depending on the duration of the bivouacs, they are divided into a small halt, a lunch halt, an overnight stay, and a day rest. Organizing a halt or overnight stay consists of choosing the right place for it, preparing the site well, putting up a tent, making a fire and ensuring the safety of the camp from the natural forces of nature.
ORGANIZATION OF RESTS AND OVERNIGHTS
Selecting a location
A place for a small rest. As a rule, it is selected on fairly flat and dry areas, in clearings, forest edges, or right on the side of a road or trail. It is advisable that there is a source of drinking water nearby—a spring or a clean stream. In windy weather, the resting place should be sheltered from gusts of wind by a strip of forest, bushes, a hillock or a coastal slope. However, where there are mosquitoes and midges, it is recommended to choose windward areas of the terrain for stopping. In winter, it is good to rest in sunny places, and in summer or in the south - in the shade.
A place for a lunch stop, overnight stay, day stay. Looked for more carefully. Usually it is chosen on the banks of a river or lake and often depends on the availability of a flat area for tents and dry fuel - brushwood, dead wood, windbreaks.
Good fuel is especially necessary at the winter field overnight site. Having a nearby source of drinking water is desirable, but in winter conditions it is not necessary, since water can be melted from the snow. When stopping in the summer on a river along which there are settlements, a tourist camp should be set up upstream from the village, watering holes and fords. It is recommended to choose places with convenient descents to the water, calm reaches and a sandy bottom without snags.
For overnight stays, places that are illuminated early by the sun are more convenient - the eastern slopes of a hill, the eastern edge of a forest, a river bank, etc. Here, dew on the grass and tents dries out faster. It’s good when a halt or overnight stay is organized in the most picturesque places where you can fish nearby, pick mushrooms or berries.
In protected natural and forested areas, tourist camps can only be set up in specially designated areas. Halts and overnight stays should not be arranged where, due to the condition of the soil, plants or the presence of water runoff, a tourist stop can contribute to erosion, for example, at the beginning of a ravine or its branches.
Safety requirements for places of rest and overnight stays. It is not recommended to camp on flooded river banks, dry stream beds or low-lying islands.
In a mountainous area, it is necessary to take into account the specific features of the relief and weather and, in order to avoid rockfalls, avalanches, landslides, and mudflows, do not locate at the foot of high rocks, under cornices, moving screes, on alluvial cones, or in avalanche-dangerous couloirs. In order not to expose yourself to the risk of being damaged by atmospheric electricity, you should not stop on ridges, hilltops, or passes during an approaching thunderstorm.
In the forest, you should be careful with fire and do not set up camp directly in the thicket of a coniferous forest or in dry bushes. There should be no rotten or cut trees near the chosen site, otherwise a sudden squall or lightning strike could knock them down on tourists.
Small stops
Organization of a short rest. Having found a suitable site and stopped the tourists, the leader distributes responsibilities between individual group members. Usually it is enough to give one of the tourists sandwiches, sour candies or vitamins, and the other to go get drinking water. Everyone else, having removed their backpacks, rests for 5-10 minutes on stumps, fallen trees or dry rises in the soil. Tired people are allowed to lie down on some kind of mat and raise their legs up (for example, put them on a backpack). It is useful to do a little warm-up.
Small break in winter conditions. Before stopping for a break, the group slows down the pace of movement so that the hot skiers can gradually cool down. After stopping, you should immediately put on something warm, such as a jacket or padded jacket. If possible, it is useful to give a sip of hot tea, coffee or cocoa from a thermos.
It is recommended to hang the backpack on a tree branch, place it on a stump cleared of snow, or, in their absence, lower it onto the back of your skis. You should not sit on a backpack, but if it does not contain food or objects that can be crushed, then in some cases an exception may be made.
In cold weather, a short rest should not last longer than 5 minutes.
Lunch stops
Organizing a lunch stop. When stopping for lunch, one or two people go for water, one starts to light a fire, the other starts to equip the fire pit, and the rest go for fuel. After water and firewood have been brought and the fire has been lit, attendants remain near it to ensure that the fire is maintained and the food is cooked. When off duty, tourists relax, swim, play sports, fish, and pick mushrooms and berries.
In sunny weather, the lunch break can be used to dry clothes and equipment. In case of bad weather, you should select a site for setting up tents in advance, and put all your backpacks in one place and cover them with a raincoat or film. The duration of the lunch break is 2-4 hours.
Winter lunch stop. Significantly shorter than the summer one: its duration depends on the speed of building a fire and preparing hot food, usually consisting of tea or a few dishes. Having stopped for lunch, you should, without taking off your backpacks and skis, first trample the snow on the camp site. Then the leader distributes responsibilities among the group members: who will dig a pit or make a flooring for the fire, who will go for fuel, who will light the fire.
The main thing when organizing a winter halt is to ensure the active participation of all tourists in bivouac work. This is the only way to carry it out quickly and prevent the body from cooling down during forced inactivity in the cold.
Overnight and day stays in the field
Organization of overnight and day stay. In many ways it resembles organizing a lunch stop. However, it requires the additional allocation of several tourists to set up tents and camp equipment. They prepare fuel for the fire, set up a fire pit, clear the camp area, build benches, hangers, dryers from available materials (Fig. 36), dig a pit for garbage, clear, if necessary, the descent to the water, etc.
In winter, these tourists, depending on the specific travel conditions and the equipment used, dig a pit for the tent, compact the path from the tent to the fire, build a windproof wall, etc. In winter overnight stays using a camp stove, two or three tourists are also allocated to prepare “small-format” firewood (to maintain heat in the tent all night). Considering that organizing an overnight stay takes up to two hours in summer, and up to three hours in winter, the stop should be made long before dark.
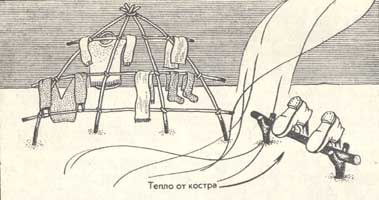 Rice. 36. Drying clothes and shoes by the fire.
Night and day mode. The correct regime helps ensure travelers have normal rest and sleep. Novice tourists on trips often sit around the fire long after midnight and clearly do not get enough sleep. Therefore, the leader announces the general curfew time in advance (usually at 23.00) and after it does not allow conversations or noise in the camp.
During the overnight and day stays, a certain time is allocated for checking and repairing personal equipment and clothing, for socially useful work and observing nature, and the remaining time is for entertainment, physical exercise, sports games, training, fishing, picking mushrooms, berries, etc. The day should also be used to better get acquainted with the surrounding area. ness, excursions and walks.
Closing down the tourist camp. Group preparations begin with packing backpacks. In winter or when it rains, backpacks are stowed in a tent. In clear and warm weather, all things are taken out of the tent, and then the entrance and window are opened wide so that it can be easily blown and dried. If the tent becomes very frosty or wet from rain during a frosty night, it is dried by the fire.
Non-transportable pegs and stands are pulled out of the ground and placed along with the remains of firewood near the fireplace. Camp structures - barriers, benches, tables are not broken - they may be useful to other tourists.
The remains of unnecessary food are carefully placed to the side - this is a gift from tourists to forest animals. But branches, moss, grass from the bedding under the tents, as well as other garbage (scraps of paper, wood chips) are carefully collected from the camp site and burned, after which they rake and extinguish the fire, filling it with water, throwing earth, snow, and covering it with turf.
Before leaving the rest stop, the leader lines up the group and checks whether everything is present, whether any things have been forgotten, whether the fire has been carefully extinguished and whether the place for the night or day has been tidied up.
Overnight and day stays in populated areas and camp sites
Overnight accommodations in populated areas. In conditions of amateur travel, they are usually arranged only in the cold season, as well as when tourists are unprepared and do not have the necessary equipment. When planning such overnight stays, it is recommended to contact local authorities in advance and agree on a specific stopping place - at a hotel, club, rural school.
If for some reason the tourists were unable to do this, it is useful to send ahead two or three “quartermasters” of strong tourists an hour before arrival, whose responsibility is to prepare the place for the reception of the entire group. They can act as attendants and prepare a hot dinner for the others when they arrive.
Overnight and day stays at camp sites. Tourist centers accept amateur tourists within the areas allocated for this purpose, or in the free places reserved for tourists arriving on tour packages. Services for amateur tourists are provided upon presentation of passports, as well as route sheets and other documents confirming the route of the tourist group.
Places at tourist bases are provided, as a rule, for no more than five days, and services are provided for cash. The service includes: overnight accommodation in buildings or tents, meals in the canteens of tourist bases, excursion services at a set price, rental of existing tourist equipment, use of luggage storage, etc.
Meals are provided both as a full daily ration and separately in the form of breakfast, lunch and dinner.
Amateur tourists living at tourist bases in their own tents pay only for household services, using on an equal basis with other tourists all types of cultural and community services (medical care, tourism consultations, lectures, library, storage lockers, showers, etc.). All tourists are required to comply with the internal regulations in force at tourist centers.
INSTALLATION AND EQUIPMENT OF TENTS
Site preparation
The selected place is cleared of hummocks, stones, and cones. For normal sleep, it is important that the platform is horizontal. In mountainous areas, for this purpose, the turf is cut off from part of the site or the site is laid out with flat stones. As a last resort, the tent is placed so that the tourists’ heads are higher than their feet. In winter, when the snow cover is shallow, a pit is dug for a tent. In other cases, they are limited to trampling the snow area and leveling it.
It is advisable to orient the tent site with the “entrance” to an open place - an edge of the forest, a river, a lake. When it is windy, the tent is placed in such a way that the wind blows into its end, i.e., the back wall.
Procedure for setting up tents
Gable tents. Gable tents are laid out with the floor down, then the lower guys are attached to the ground with pegs so that the floor of the tent lies without distortions. After this, take two one-and-a-half-meter posts (their length depends on the height of the tent being installed), place one at the entrance, the other at the rear end of the tent, and overlap guy ropes attached to the ridge of the tent roof over them. The ends of the guy ropes are attached with pegs to the ground at a distance of 2-3 m from the tent, trying to maintain their direction along the center line passing through the ridge of the roof.
Having fastened the entrance to the tent to avoid distortion of the slopes, they begin to tighten the roof guy wires. When stretched, the guy ropes should represent a continuation of the diagonals of the slopes. Therefore, the pegs are driven in at an angle of 45° to the sides of the tent.
When setting up a tent in the forest, first stretch the main guy ropes of the roof ridge between the trees, and then stretch the floor and guy ropes of the slopes. Instead of pegs, tree trunks and bushes are used. The tent is set up correctly when the roof does not wrinkle in folds, the walls do not sag, and the floor is not raised.
Instead of wooden pegs, it is convenient to use metal pins, which can easily be stuck into the ground without the help of an ax. In the mountains, stones are usually used instead of pegs, and the stands are replaced with an alpenstock or ice axes tied in pairs. In water trips, oars can play the role of stands.
Winter and special tents. Tents, two-layer tents with awnings are installed depending on the features of their design (see the chapter “Equipment”). If there are trees, the main and side guy ropes are tied to them. In winter, instead of racks and pegs, you have to use skis and ski poles, sometimes tied in pairs. During severe frosts or wind, the side walls of winter tents should be covered with snow.
Tent equipment
Equipping a tent for an overnight stay. Tourists lay out mats (inflate rubber mattresses), put sleeping bags on them, and place backpacks with soft things at the head of the tent. Small personal items - compasses, glasses, toiletries are placed in the pockets of the tent, shoes are placed at the entrance under the floor, and dishes (if they are not left near the fire or on the branches of a nearby tree) are hidden under the visor of the roof slope. For lighting in the tent, an electric flashlight or candle is mounted on a suspension in advance.
Additional tent equipment. Depends on specific travel conditions. If the weather is rainy, you should put plastic film or other waterproof material on the roof of the tent. If you don’t have a cover, you shouldn’t touch the roof panel from the inside during rain, as it will easily leak in these places. If this does happen, quickly press your finger to the leakage site and slide it down the slope - now the water will flow down the inside of the wall without bothering you with an annoying drop. You should dig a small ditch around the tent with a drainage groove for rainwater.
When traveling through taiga terrain, it is useful, in addition to the standard double-leaf entrance, to sew a tube entrance made of thick gauze in the form of a sleeve with a tightening neck to the tent and pre-treat it, as well as all the cracks and holes in the tent with some insect-repellent composition. During the journey, this treatment must be repeated periodically.
Winter tent equipment. As a rule, a camping stove is installed in a winter tent. It requires a special place and reliable support in the form of a central stake (in a tent), a ridge rope or sliding legs. A special place in the tent is also reserved for storing firewood. Ropes are stretched along the exhaust pipe from the stove, on which tourists dry their belongings overnight. To isolate sleepers from the cold air from the door, a tube entrance is made to it. To avoid snow getting on the tent and freezing above it, it is recommended to pull the awning from any lightweight material.
bonfires and hearths
Fire pit
Fire pit. Select an open but safe place protected from the wind, preferably near water. A fire should be made on already trampled areas or on old ones. fire pits. It is advisable to have a sapper shovel with you: it is convenient to remove the turf from the place chosen for the fire and dig around it | groove. As a last resort, an ax is used for this. In any case, all dry leaves, branches, pine needles, grass that can catch fire should be removed from the fireplace at a distance of 1-1.5 m.
Fire safety. This is the main requirement when choosing a place for a fire. You cannot make a fire closer than 4-6 m from trees, resinous stumps or roots. Tree branches should not hang over the fire.
Do not light fire in young coniferous trees. The most terrible crown fire can easily break out here.
Do not light fires in areas with dry reeds, reeds, moss or grass. The fire hits them at high speed.
A fire in clearings where there are remnants of forest combustible materials is dangerous: here the fire spreads quickly and the fire that has started is difficult to stop.
Do not light a fire on peat bogs. Remember that smoldering peat is very difficult to extinguish, even by filling it with water. Unnoticed smoldering can easily turn into a destructive peat fire.
Do not light fires in the forest on rocky areas. In such places, forest debris and humus accumulate between the stones. Fire that penetrates the cracks can spread through deep and winding passages between the stones. It is almost impossible to put out such a fire. One fire can turn picturesque, forested hills into dead piles of rocks for many years.
Lighting a fire
Kindling. Lighting a fire begins with preparing kindling, which is made from small spruce branches, birch bark (taken, of course, not from a living birch), dry moss, lichen, shavings, and splinters. In wet weather, kindling is obtained from chips of dead wood split with an ax, from dry pine litter, sheltered from the rain by tree crowns.
The prepared kindling-fuse is placed under small brushwood folded in a hut or well and set on fire, and thicker firewood is carefully placed on top.
When it rains, a fire is lit under the cover of a cape or cloak held by two tourists. The stronger the wind or rain, the denser the kindling and fuel should be placed on the fire. In bad weather, it’s good to have dry alcohol, old photographic film, a candle stub, and a piece of plexiglass or rubber with you.
Lighting a fire without matches. If matches are lost or if they are damp and for some reason cannot be dried, fire for the fire is obtained in a more difficult way. In sunny weather, a magnifying glass is used for this (as well as camera lenses and even glass from watches or glasses). If the group has a firearm, you should fire a blank shot into the ground, after filling a one-third cartridge case filled with gunpowder with cotton wool, dry moss or grass. You can try using flint (selected from the surrounding stones) to strike sparks on tinder or start a fire by quickly rolling out a cotton strand between two dry pieces of wood. However, these methods are very labor-intensive and, without proper practice, rarely give positive results.
Fuel procurement
Firewood. Near populated areas, as well as in populated areas, firewood that is not suitable for the economic needs of the local population, for example, small dead wood, dry crooked forest, old stumps, and pine litter, can be used as fuel.
If such fuel is not available nearby, then you should purchase firewood for the fire through the forestry department or take primus stoves and gas stoves with you on a hike.
In taiga areas there is usually always enough brushwood, dead wood, and dead wood. When preparing fuel, however, it should be borne in mind that damp and rotten firewood produces a lot of smoke, but little heat; small brushwood burns out in the first two to three minutes; Aspen and fir firewood are bad because they “shoot” sparks too much.
For cooking, it is better to use dead wood of birch and alder, which burns evenly and with almost no smoke. If you need to make a big hot fire, for example, in winter when you are forced to spend the night, then the best firewood will be from pine, cedar and spruce dead wood.
Dry wood felling. When preparing dead wood for a fire, they first determine the natural slope of the tree and the place where it might fall, then they look at the probable path of the falling tree to make sure that it will not hang on the neighboring crowns, and only after that they cut a third of the diameter of the trunk on the side where the tree is to be felled.
The second hem is made on the opposite side, approximately a palm higher than the first. When cutting down a tree, you need to alternate striking at an acute angle with straight blows, which “choose” the wood. If the tree does not fall under the influence of its own weight, then a wooden wedge or lever is used, which is used to direct its fall to a free area. In this case, precautions must be taken. There should be no people not only at the site of the expected fall, but also behind the tree, as it can bounce back with its butt.
If the tree is thick enough, then a two-handed saw should be used to fell it. You can determine whether a tourist is dealing with a living or dead tree by its top (but not by its bark or lower branches). If the top is dry, then the whole tree is dry.
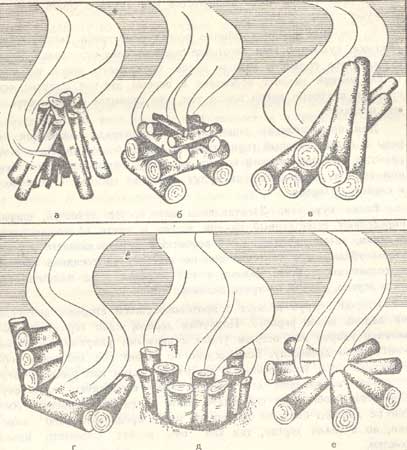 Rice. 37. Types of fires: a - “hut”; b - “well”: c - “taiga”; g - “fireplace”; d - “Polynesian”; e - “star”
Bonfires in wooded areas
"Hut". A “hut” type fire is convenient where tourists are going to cook food in a small amount of dishes and at the same time want to illuminate the camp site. The advantage of this cone-shaped. or a gable fire in that it uses thin “waste” firewood (brushwood, dead wood) as fuel. Providing a high, bright flame, the fire at the same time has a very narrow heating zone and produces few coals, requiring constant lining of dry wood (Fig. 37a).
"Well". This is one of the types of hot fires. It is made up of more or less thick short logs laid in rows (Fig. 376). Burning slowly, the logs form a lot of coals, giving a high temperature. Such a fire is convenient for cooking, as well as heating and drying clothes.
“Taiga” fire. It is made up of logs 2-3 m long, laid lengthwise or at an acute angle to each other (Fig. 37c). A wide fire front allows you to cook food on it. for a large group, to dry things, and also to spend the night nearby for those who for some reason do not have tents. Being a long-lasting fire, “taiga” does not require frequent addition of firewood.
Among other types of fires, “fireplace”, “Polynesian”, “star” can be recommended. The features of their installation are clear from Fig. 37 g, d, f.
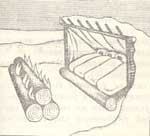 Rice. 38. Nodya fire and reflector barrier.
"Nodya". For such a fire (Fig. 38), smooth logs (spruce, pine, cedar) are prepared and cleared of branches and twigs. Two logs are placed side by side on the ground, then good kindling or, even better, coals from the “pilot” fire are placed on them (in the gap), and everything is pressed on top with a third log. Kindling can also be placed between two logs lying on top of each other, but to do this, you must first make a trench in them.
“Nodya” gradually flares up and burns with an even hot flame for several hours without additional fuel. You can regulate the heat of the fire by slightly moving apart and moving the lower logs or (if the log is lying on a log) by moving the third log - the air draft regulator.
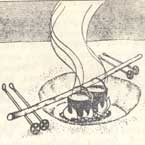 Rice. 39. A fire in a snow pit.
Bonfire on a winter journey. If the snow cover is shallow, a fire is lit in a specially dug snow pit. Digging such a pit is quite labor-intensive and is carried out by two or three tourists using duralumin shovels, buckets, pots, and pieces of plywood. The crossbar for the fire is installed on tripods made of ski poles or rested on the edges of the pit, having previously placed ski poles on the snow (Fig. 39).
In deep snow and in the presence of waste damp or rotten logs, it is better not to dig a fire pit, but to light a fire on a special platform. The platform is laid from several raw logs, under which two more transverse deadwood should be placed for greater stability.
The fastest way to start a fire in winter is on a metal mesh, which is stretched between the trees. This mesh (mesh size 3-4 mm, wire thickness 0.5 mm) is also used when organizing overnight campfires to protect sleepers from sparks from “firing” firewood. The mesh is rolled up and carried in the side pocket of the backpack.
Outbreaks in sparsely forested areas
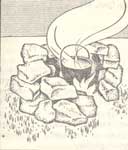 Rice. 40. Hearth in a mountainous area.
A fire in a sparsely wooded area requires saving firewood and being as careful as possible with the vegetation. In the steppe, fire pits are made from turf, in the mountains - from stones (Fig. 40). When laying the fireplace, you should remember that you can achieve better combustion if the distance between the side walls of the fireplace on the windward side is made wider than on the leeward side.
“Firewood” in treeless areas is dry bushes, grass, reeds, and dung. The best artificial fuels in these places are dry alcohol, gasoline, and gas.
The consumption of dry alcohol to prepare a lunch from concentrates for 4 tourists is usually 200-300 g. Alcohol tablets are very hygroscopic and require careful moisture-proof packaging, otherwise its consumption may double. For cooking with gasoline, it is convenient to use the so-called tourist primus, which weighs less than one kilogram with the gas station.
In the case of using stoves and tiles, it is recommended to erect windproof walls and heat-reflecting screens. Folding camp kitchens are even more convenient (Fig. 41).
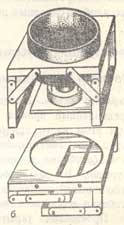 Rice. 41. Folding safe kitchen: a - working position with primus stove; b - stowed position
SIMPLE COVERS
Accommodation without a tent
Shelters in summer. Sometimes it is necessary to stop for an unexpected halt or overnight, and quickly set up a bivouac shelter. In this case, you often have to use only improvised materials that replace a regular tent. At night at such a bivouac (especially in cool weather), shift duty is organized. The responsibilities of those on duty include maintaining the fire, drying things, boiling water, and ensuring that all those sleeping, especially those lying on the edges, are well covered.
The simplest shelter in summer, which to some extent replaces a tent, is a piece of rubberized nylon, thin tarpaulin, plastic film, oilcloth, or, at worst, a light blanket, which can quickly be turned into a fairly reliable tent. Depending on the size of the group and the location of the supports, the awning can be single- or double-sloped, stretched low or high, above the ground. The same awning can be used to protect the fire from rain or wind.
If there is no material for an awning, tourists take shelter under a canopy of thick spruce or cedar branches, an overturned boat, in a recess in the rock.
Overnight in winter. In winter, barriers are installed on the bivouacs to protect against cold and wind. Their construction begins with the construction of a frame of poles and thick branches. Then the frame is intertwined with thin branches. To better reflect heat, the inner surface of the curtain is covered with sheets or liners for sleeping bags, and the bed itself is made inclined towards the fire. As a support for the legs and to avoid overheating, a transverse log is attached with two pegs at the lower edge of the bed. Outside, the barrier is covered with snow.
If the number of poles and branches is small, a barrier is constructed from skis stuck into the snow and blankets secured to them using ski poles. The bottom edges of the blankets must be sprinkled with snow.
Sometimes tourists organize overnight stays using the so-called hunting method. 2-3 hours before bedtime, make a hot fire and warm the ground properly. Then the fire is moved to the side and they are laid in a dense group on dry, warm soil, with backpacks and other soft equipment laid down.
Accommodation without a tent in winter in a treeless area
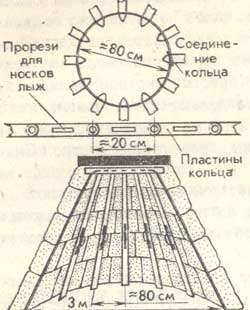 Rice. 42. Shelter p. a frame of skis connected by a metal ring.
Snow pits, caves, and huts sometimes provide the only shelter for tourists when they are forced to spend the night without a tent in a treeless area during the winter. Convenient places for their construction are areas with dense and thick snow cover: snowdrifts, blows, slopes of ravines. Having dug a hole using any available means and taken refuge in it, you need to close the entrance hole as tightly as possible with a windbreaker or a blanket hung on the skis. To better conserve heat, it is better to make the entrance to the cave as narrow as possible and lead it from below.
Where the crust is especially strong, and the insignificant thickness of the snow does not allow digging a deep hole (on the ice of large reservoirs, in sunny and windward places with little snow), a snow hut is built for shelter. They build it by cutting snow blocks with knives and laying them in rows in the form of a vault. If you don’t have the skills to work with snow, the ceiling is made from skis and ski poles, covering them with a blanket or snow plates. For better heat retention, the cubic capacity of pits, caves and huts should be minimal.
You can quickly make a shelter if you take a metal ring of 13 plates with slots for ski noses on your hike in advance in case of an emergency (Fig. 42). This ring is the upper support of 12 skis that form the frame of the tourist “chum”. Plastic film is hung on the skis, and snow blocks are placed on the sides and top. When transporting, the ring is folded like a measuring meter.
While in such shelters, you need to put on all your warm clothes, hide your legs in a backpack, and put the rest of your things underneath. It is useful to periodically take sugar, fats, and, if possible, drink hot drinks. In conditions of such overnight stays, it is necessary to assign a duty officer who monitors the condition of his comrades.