
Ways to navigate while traveling
To navigate the terrain means to find the direction of the sides of the horizon and your location relative to surrounding local objects and relief elements. Orientation when moving in unfamiliar areas consists of determining distances and maintaining the desired direction of the route.
In practice, a tourist has to navigate all the time, use a variety of techniques and means of orientation: a map, compass, watch, celestial bodies, relief contours, various local objects and signs. Experienced travelers even develop a special sense of orientation in space. For a novice tourist, the basics are the ability to work with a compass and a map, without which not a single tourist trip can be done.
ELEMENTS OF TOPOGRAPHY
Maps and diagrams
Map. This is a reduced image of the earth's surface, made to a certain scale. The types of cards are very diverse. The most accurate are topographic ones. However, tourists most often deal with regional maps and tourist maps.
Regional administrative maps, published for most regions of the USSR, give an idea of the location of settlements and allow you to see an image of a large area of the area.
Tourist maps are published for the most popular travel areas. They are less detailed and accurate than topographic ones, but contain data that is not on topographic maps (location of tourist centers, camps, excursion sites, the most picturesque places, etc.). Some maps depict a particular route, others are provided with a detailed description of the area and the sights encountered. For practical movement along the route, it is advisable to have a diagram (plan, outline) on a larger scale.
Terrain diagram. It is usually performed on the basis of a map, by redrawing the most important relief elements from it, or by direct copying by squares (with enlargement). For copying, it is most convenient to use a photograph that allows any change in the scale of the original, or tracing and then obtaining blueprints. You can use plain paper. In this case, the card is placed on glass, paper is placed on top of it, and an electric lamp is placed under the glass. The map pattern illuminated in this way can be easily transferred even to thick paper.
It is advisable to paste the diagram (map) onto thin thick cardboard, cut it into small rectangles (according to the format of the existing tablet) and stick it on the fabric with 2-3 mm intervals between the rectangles. In this form, it can be easily folded like an accordion and preserved from chafing. To protect the circuit (card) from rain, its surface should be coated with colorless varnish.
Scale
Scale is the ratio of the length of a line on the map to the length of the corresponding rainfall on the ground. The accuracy of the depiction of the area on the map, the completeness, and detail of the map depend on its scale. There are two types of scales - numerical and linear.
The numerical scale is depicted as a fraction, the numerator of which is equal to one, and the denominator is a number showing how many times the actual length of the line is reduced on the map.
For example: - 1/250000 1/50000.
A linear scale is depicted by a straight line divided into centimeters or other equal parts. These parts are called the scale base. They correspond to a certain number (inscribed nearby) of meters or kilometers on the ground.
When the scale is reduced, many details are not depicted in order to avoid loading the map: thus, small turns and bends of roads, rivers and streams disappear. This should be taken into account when traveling. The length of a winding river, a winding dirt road, or the shore edge of a lake, measured on a small-scale map, will turn out to be much longer on the ground due to the fact that all these details are missing on the map, and only the general, general direction of the lines is given.
Reading the map
Conventional signs . This is the alphabet, knowledge of which is necessary to read the map. Although the designations of symbols depend to a certain extent on the scale of the map, they are usually divided into three groups: large-scale, non-scale and explanatory. The first depict local objects (usually with an outline) that “fit” into the scale of the map: lakes, large cities, etc. The second are objects that cannot be expressed on a given scale. This sign cannot be used to judge the actual size of the village, well or bridge shown on the map. The third characters include numbers, inscriptions and other designations.
As the scale of the map decreases, large-scale symbols turn into non-scale symbols. When reading conventional signs, you need to know that the map (plan) usually depicts the summer state of the area. The most common and necessary symbols for a traveler are shown in Fig. 24.
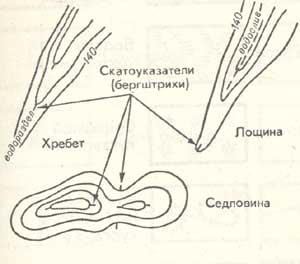 Rice. 23. Representation of relief forms with horizontal lines.
Terrain. It is depicted on large-scale maps using contour lines, which are curved closed lines connecting terrain points on the map that are the same in height above ocean level.
The height distance between two adjacent horizontal lines taken on the same slope is called the section height, and the distance between the horizontal lines according to the plan is called the laying. The steeper the slope, the smaller the slope, and vice versa. To determine the steepness of the slope, measure the shortest distance between adjacent horizontal lines and select the corresponding slope on a scale, against which the steepness of the slope is read in degrees. To determine the direction of the slope along the horizontal lines, perpendicular lines are placed on some of them—slope indicators (berg strokes), “looking” with their free end in the downward direction (Fig. 23).
Some relief forms are depicted not by horizontal lines, but by special symbols. So, cliffs, ravines, shafts, holes are shown as a line with jagged edges facing the steep slope. When using small-scale maps, tourists may encounter relief images using the wash method (thickening the shadows) and the hypsometric method (“the higher, the darker”).
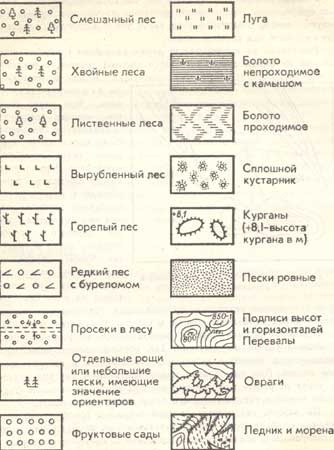
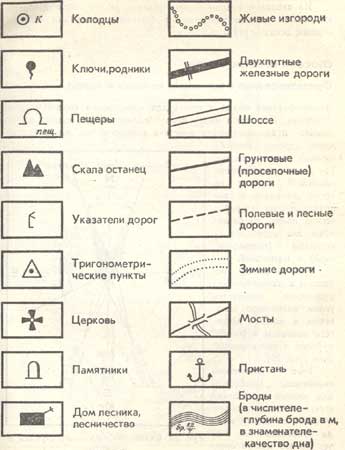
Symbols on maps
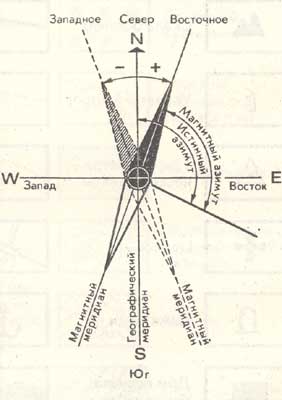 Rice. 25 Magnetic needle declinations and azimuths.
On maps where only the hydraulic network (rivers, streams, lakes) is plotted, the relief has to be “completed” in the mind, based on the density, direction and tortuosity of watercourses and elevations.
On diagrams and plans of mountainous areas, the relief is often depicted only by the lines of watersheds (ridges), marks of the main peaks, and the display of rivers and glaciers.
WAYS OF ORIENTATION
Orientation using a compass and map
Map orientation. Used to determine your location. To do this, place the map horizontally, place a compass on it, and rotate the map together with the compass so that the direction of the compass arrow coincides with the meridian. Since the direction of the magnetic needle does not exactly coincide with the direction to the geographic pole, two meridians are distinguished - true (geographic) and magnetic.
The difference between the true and magnetic meridians is called the magnetic declination angle and can reach 10-20° or more and have a different sign (Fig. 25).
Accounting for magnetic declination. Necessary for accurately determining your location. Local declination is sometimes indicated on the map. But it can also be determined by the North Star or approximately, without taking into account local magnetic anomalies, according to the attached diagram (Fig. 26).
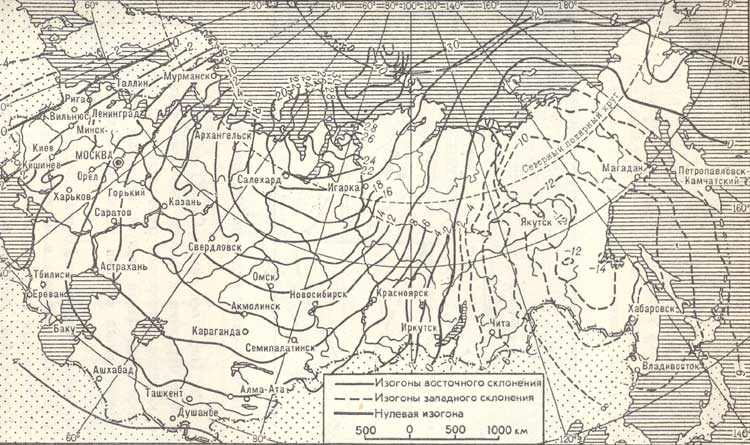
Rice. 26 Schematic map of magnetic drift on the territory of the USSR
If the magnetic declination is eastern, then on maps it is signed with a plus sign (for example, +7°). This means that true north is to the left of the direction of the north end of the magnetic needle by an amount of 7°. Therefore, you need to turn the compass so that the northern end of the arrow coincides with the indication “7°” on the dial. Then, the N-S limb axis will pass through the true geographic meridian and the compass will be precisely oriented in relation to the sides of the horizon. In the case of western magnetic declination (minus sign), true north lies to the right of the northern end of the arrow also by degrees of magnetic declination.
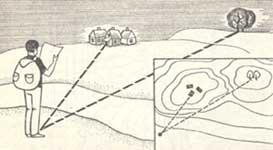 Rice. 27. Map orientation based on local objects.
Determining your location. After the map is oriented, it is “tied” to the area by sighting at noticeable objects or using a compass. To do this, they find out the magnetic azimuths of two landmarks using a compass and, after making corrections for the local magnetic declination, determine the geographic (true) azimuths of these landmarks. Then, from the point where the landmarks are depicted on the map, lines are drawn at the reverse azimuth (the reverse azimuth is equal to the observed ±180°). The intersection of the lines on the map will determine your location (Fig. 27).
Orientation with a map without a compass
Orientation with a map but without a compass is different. that the map is oriented along terrain lines or landmarks.
Orientation along the terrain line. During a hike, it is used when the route coincides with a straight section of a road, clearing, or river. In this case, it is enough to provide a direction to one more landmark. The intersection of this direction with the image of the terrain line on the map will give the standing point (semi-resection method).
Point reference and resection method. When a tourist is near a point landmark, he should find this landmark on the map and use the second landmark to direct the top edge of the map to the north. If the landmarks are far away, then the standing point is determined by the backsight method. To do this, having oriented the map, they sequentially sight and draw directions to two landmarks. The point of intersection of the directions will be the standing point. For control, take the third direction.
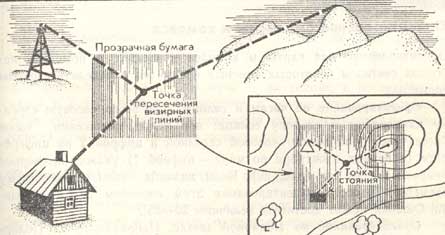 Rice. 28. Orientation using the Bolotov method.
Bolotov method. Used when it is impossible to accurately orient the map. To do this, from one point on a piece of transparent paper, they sequentially sight and draw directions to three landmarks visible on the ground and identified on the map. Then they put transparent paper on the map so that the drawn directions to the landmarks pass through their images on the map (Fig. 28). With this position of the sheet, the point on it (and the map) will be the tourist’s location.
In practice, travelers often also resort to approximate orientation, determining the standing point by the distance to the nearest landmark on the map.
Orientation without a map and compass
Orientation without a map and compass allows you to determine the sides of the horizon using celestial bodies and some local objects.
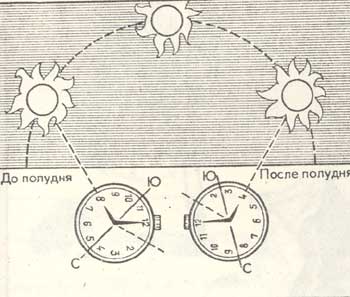 Rice. 29. Orientation by the sun and the clock (for the winter half of the year)
Orientation by clock and sun. To do this, the hour hand is directed towards the sun: with this position of the clock, the bisector of the angle between the hour hand and number 2 on the dial (from October to March - number 1) will indicate the approximate direction to the south (Fig. 29). The clock should be set according to local time. The accuracy of orientation using this method in summer is low. The error can reach 20-25°.
Orientation by the North Star. The direction to the North Star is determined as follows. A straight line is mentally drawn through the two outermost stars of the “bucket” of the Big Dipper, on which five times the distance between these stars is plotted. At the end of the fifth segment there is the North Star, accurately pointing (errors less than 2°) to the north (Fig. 30).
Moon orientation. For approximate orientation, it is useful to know that in the summer in the first quarter the moon is in the south at 20 o'clock, in the west at 2 o'clock in the morning, in the east at 2 o'clock in the last quarter, and in the south at eight o'clock in the morning. When there is a full moon at night, the sides of the horizon are determined in the same way as by the sun and the clock, and the moon is taken for the sun.
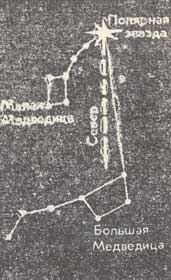 Rice. 30. Orientation by the North Star.
Orientation on local subjects
Some local objects and signs can also serve as a simple, although not very accurate, “compass” for a traveler (Fig. 31).
It is known, for example, that mosses and lichens cover the northern side of trees and stones, resin protrudes more on the southern half of the trunk of a coniferous tree, ants make their homes south of the nearest trees or bushes and make the southern slope of the anthill flatter than the northern one, the altar of Orthodox churches is located in the east, etc.
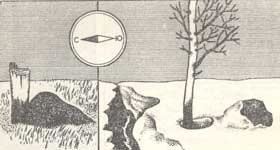 Rice. 31. Determining the sides of the horizon from an anthill; by melting snow in a ravine; along the hole near the tree; on the snow stuck to the stone.
It is not recommended to navigate through these; incorrect, although well-known signs, such as the density and splendor of the crown on one side or another of a tree standing alone or located in the thick of a forest, according to the annual rings of wood growth on the stumps of cut down trees. Both the density of the crown and the width of the growth rings depend on a number of factors, among which solar illumination may not be the main one.
You need to be very careful when navigating using block posts in the forest. Although it is believed that the edge between two adjacent faces of the pillar with the smallest numbers points to the north (Fig. 32), it must be remembered that clearings in a given forest should be cut not along meridians and parallels, but along the relief line or parallel to roads and land boundaries.
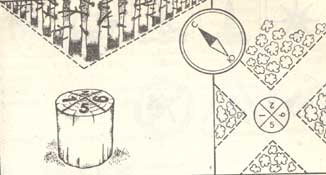 Rice. 32. Determining the sides of the horizon using a quarter post in a forest clearing.
Orientation according to tourist markings
Tourist marking is a system of special symbols that are applied to local objects to mark tourist routes.
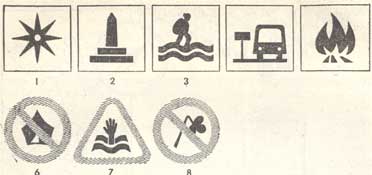 Rice. 33. Some advisory, prohibitory and restrictive signs of tourist markings: 1 - attraction; 2 - monument or memorial place; 3 - ford; 4 — bus stop; 5 - place for making a fire; 6 - halting is prohibited; 7 - place dangerous for swimming; 8 - no touching allowed
Marking includes various types of marks, directional arrows, pointers and other signs, which in their symbols, shape, color and alphanumeric code carry the information necessary for tourists and help navigate the area.
The main marking element - the route mark - has the shape of a rectangle (the main format is 180-240 mm), on a white field of which there is a colored stripe or a square placed on the corner. A stamp with a red stripe denotes a multi-day category route, a stamp with a blue stripe indicates a “USSR Tourist” badge, a stamp with a green stripe indicates a 3-4-day route, and a yellow stripe indicates a 1-2-day route (with overnight stays). Stamps with colored squares indicate different routes for hiking without overnight stays.
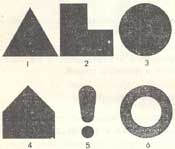 Rice. 34. Simplified tourist markings: 1 - observation point; 2 - monument; 3 - drinking water; 4 - shelter, place for bivouac; 5 - danger; 6 - end of the road
Guided by the stamps, tourists can follow the route without a map, compass and description: directional, warning, prescriptive and prohibitory signs will tell you where there are objects for inspection, bivouac sites, shelters, protected natural attractions, swimming places, what is the distance to a particular point, what types of tourist activities are allowed, what dangers are expected ahead, etc. Some of these common signs are shown in Fig. 33. Since full marking is carried out, as a rule, only on planned routes, simplified marking signs are also used for orientation on amateur trips of categories I-III of complexity (Fig. 34).
ASSESSMENT OF DISTANCES AND TIMES
Determining distance in steps
To determine the distance from your steps, you need to know their length. The average length of a pair of steps can be conventionally assumed to be 1.5 m. Steps can be counted in threes, counting threes alternately under the right and left foot. If the distance is measured by running, then the count is made in five steps. When measuring large distances, every hundred counted pairs or triplets of steps are noted by writing, bending fingers or other means. It is more convenient to use a special device—a pedometer.
Determining distance by constructing similar triangles
When determining the distance to inaccessible objects, various techniques are used related to the construction of similar triangles.
Determining distance using a match. A match is the simplest rangefinder. First, you need to apply two-millimeter divisions on it with ink or pencil. It is also necessary to know the approximate height of the object to which the distance is being determined. Thus, a person’s height in meters is 1.7, a bicycle wheel has a height of 0.75, a rider has a height of 2.2, a telegraph pole has a height of 6, a one-story house without a roof has a height of 2.5-4 meters.
Let's say we need to determine the distance to a telegraph pole. We point a match at it at arm's length (Fig. 35), the length of which for an adult is approximately 60 cm. On the match, the image of the pillar took up two divisions, that is, 4 millimeters. Using these data, it is easy to make the following proportion:
arm length / distance to post = match length / post height = 0.60/X = 0.004 / 6.0; X=0.60*6.0/0.004=900
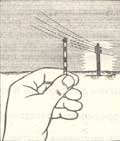 Rice. 35. Determining distance using a match
Thus, the distance to the pillar is 900 meters.
Hiking standards. To take measurements along the route using the construction of similar triangles, it is useful for tourists to know some other hiking standards.
The length of the “quarter”, that is, the distance between the bottoms of the spaced thumb and little finger, is 18-22 cm.
The length of the index finger from the base of the thumb is 11-13 cm, from the base of the middle finger - 7-8 cm.
The greatest distance between the ends of the thumb and index fingers is 16-18 cm, between the ends of the index and middle fingers - 8-10 cm.
The distance between the ends of a person's horizontally extended arms is usually equal to his height.
The distance from the eyes to the raised thumb of an outstretched hand is 60-70 cm.
The width of the index finger is about 2 cm. The width of his nail is 1 cm.
The width of the four fingers of the palm is 7-8 cm.
Each tourist determines the specific length of these and other standards independently and writes it down in his hiking notebook.
Estimating distance by eye and by hearing sounds
Table of distances for the beginning of visibility of objects. To estimate the distance by eye, you can use the following table.
| Name of items | Distance |
| Daytime: | |
| Populated points | 10-12 km |
| Large buildings | 8 km |
| Individual small houses | 5 km |
| Windows in houses (without sash) | 4 km |
| Roof pipes | 3 km |
| Individual trees | 2 km |
| People (in the form of points) | 1.5—2 km |
| Movements of human legs, arms | 700 m |
| Window frames | 500 m |
| Human head | 400 m |
| Color and parts of clothing | 250-300 m |
| Leaves on the trees | 200 m |
| Facial features, hands | 100 m |
| Eyes (dotted) | 60-70 m |
| Night time: | |
| Burning fire | 6-8 km |
| Flashlight | 1.5-2 km |
| Burning match | 1-1.5 km |
| Cigarette Fire | 400—500 m |
Features of vision of various objects along the route. They depend on many factors, and primarily on the distance to objects. The further away an object is, the lower and narrower it looks than it actually is. Therefore, large objects appear closer than small ones. Lying objects (for example, a fallen tree) appear longer than standing ones of the same size.
The distance on water, in a gorge, on snow seems shorter than actual. The width of the river from the flat bank appears greater than when observed from the steep bank. When looking from top to bottom, from the foot of a mountain to its top, the slope seems less steep, and objects on the mountain are closer than when viewed from top to bottom, from the mountain. At night, all light sources and brightly lit objects appear much closer to their actual position. During the day, objects that are light or painted in bright colors appear closer than objects that are dark or have little contrast with the natural background.
Corrections for psychological errors. When orienting and estimating the distance along the route, one must remember that the steepness of bare slopes usually seems greater than that of forested ones; the distance to a distant forest, river, mountain is shorter than real; a flat road - less long than the same path off-road. Kilometers traveled under a heavy backpack, in bad weather or in poor visibility conditions are especially lengthened.
Table of audibility of various sounds. The table shows the range of audibility of sounds in open areas in quiet conditions and with normal air humidity.
| Sound sources | Average hearing range |
| Running train noise | 5—10 km |
| Shooting from a hunting rifle | 2—4 km |
| Sharp noise from a tractor engine, tractor, car horns | 2—3 km |
| Dogs barking, neighing horses | 1—2 km |
| Vehicle movement on the highway | 1—2 km |
| Loud scream (inaudible) | 1—1.5 km |
| Movement of vehicles on dirt road | 0.5—1 km |
| Fall, crack of a felled tree | 800 m |
| The sound of an axe, the squeal of a saw, the clinking of pots | 300—500 m |
| People talking (inaudible) | 200 m |
| Low speech, cough | 50—100 m |
Time Estimation
Time can be determined by the sun (sundial), moon, stars and individual natural phenomena that have a daily rhythm of development. The ability to tell time without a watch is important for tourists, not so much in case of loss or breakage of the watch, but for developing observation skills and carrying out various types of observation of nature. . .
Flowers can be used to give an approximate estimate of time on clear summer days. Below is a table indicating the hours at which some of the most common flowers in the central part of the country open and close.
| Plant names | Flowers open (clock) | Flowers close (clock) |
| Meadow salsify | 4—5 | 10—11 |
| Chicory | 5—6 | 15—19 |
| Rose hip field | 5—6 | 20—21 |
| Dandelion | 6—7 | 15—18 |
| Field sow thistle | 7—8 | 11—12 |
| Field flax | 7—8 | 17—18 |
| Umbrella hawkweed | 7—8 | 18—19 |
| White water lily | 8—9 | 19—20 |
| Violet tricolor | 8—9 | 16—17 |
| Carnation | 10—11 | 14—15 |
| Field marigold | 10—11 | 16—17 |
| Kislitsa | 10—11 | 18—19 |
| Coltsfoot | 10—11 | 18—19 |
| Scented tobacco | 20—21 | |
| Smolevka | 21—22 | |
| Night violet | 21—22 |
You can also approximately determine the time in the summer morning hours by the awakening of birds and their first songs.
| Name of birds | First song time (hours) |
| Finch | 2—2.30 |
| Robin | 3—4 |
| Quail | 3.30—4 |
| Thrush | 4—4.30 |
| Chiffchaff | 4—5 |
| Tit | 5—6 |
| Sparrow | 6—7 |
MOVEMENT IN AZIMUTH
Azimuth
What is azimuth? This is an angle measured clockwise from the direction north to the direction towards a given object (landmark). Azimuth is measured in degrees from 0 to 360. If the geographic meridian is taken as the initial direction, the azimuth is called true; if the magnetic meridian is taken as the initial direction, the azimuth is called magnetic.
Azimuth movement. It consists of determining the desired direction on the ground at a given azimuth and maintaining this direction along the way until reaching the intended point. During a hike, movement in azimuth is usually resorted to in closed areas or off-road, for which magnetic azimuths and distances to landmarks are determined in advance using a map.
Movement using intermediate landmarks
When moving in azimuth, the practical accuracy of reaching a landmark is usually up to one tenth of the route traveled. Therefore, it is always advisable to mark intermediate landmarks along the route. To do this, before moving, set the compass sighting device to the desired direction and orient the compass. Then they sight in the desired direction (or near it) some clearly defined and not very distant landmark, towards which they move. Having reached the landmark, the operation is repeated again. When determining the direction, you must ensure that the northern end of the compass needle coincides with the north mark on its dial.
When moving in azimuth, tourists may encounter significant obstacles along their path, such as a lake or a rocky area. To strictly maintain the general direction, it is advisable to go around them along a broken straight line with the least number of “elbows”. When walking around, you should clearly record the values of intermediate azimuths and the distances traveled along them.
In order not to go astray from the right direction, it is useful to draw on a piece of notepad (on a tablet) while moving, a detour path with angles and lengths of “knees”.
Movement without clear guidelines
In the absence of landmarks. In the field, tundra, steppe, where there are no landmarks, or in poor visibility, you can move using the alignment method. The tourist leading the movement controls the direction, being at the end of the group: he sees the entire chain of tourists, can compare its direction with a given azimuth and promptly warn about deviations.
If there is a sun (moon, stars), you can move in azimuth by measuring the direction angle in relation to these celestial bodies. Every half hour their position in the sky must be clarified using a compass. Of the techniques for such orientation, the most common is orientation by one's shadow.
In windy weather, it is useful to remember the direction of the wind or the movement of clouds relative to the sides of the horizon.
In wide open spaces in winter, snow sastrugi can be used to guide movement. In a densely forested area, in order to maintain direction, it is recommended to alternately bypass the encountered obstacles - trees, bushes, rubble - either from the left or from the right.
Sometimes, in the absence of intermediate landmarks, it is useful to make a deliberate deviation in a certain direction from a given azimuth. Having covered the distance calculated in steps or according to the time of movement to the final landmark, tourists turn sharply to the side and look in a new direction (one, and not in two opposite ones, as would be the case if they were moving straight along a given azimuth) for the desired point on the ground.
For large distances, it is necessary to mark out limiting (lateral) landmarks, and choose the final landmark as linear as possible and such that it is deployed with a wide front towards the direction of movement of tourists.
If you lose orientation. On an easy section, you can continue moving forward as a group until you reach a known place. You can’t do this on a difficult section of the route: here it’s better to spend time on thorough reconnaissance than to go blindly.
If tourists are lost and reconnaissance does not give hope of finding their way correctly, then in the absence of roads they need to go out onto the “water” and walk along it downstream: a stream will lead to a river, that will lead to a large river, where tourists will definitely meet a person, housing, and receive the necessary help. Along the way, you should leave notes with notes in visible places - this will make it easier and faster to find the missing.